How to Use a Sound Wall
3 Steps to Effectively Implementing a Sound Wall
If you are teaching a primary grade and learning more about the science of reading, then you have probably heard about Sound Walls. This multifaceted display is making its way into classrooms worldwide as determined teachers learn how to implement them effectively.
If you aren’t familiar with the components of a Sound Wall, I want to encourage you to read my post: “What is a Sound Wall?” It is also important to note that a Sound Wall takes the place of a Word Wall. If you love your Word Wall and aren’t sure about making the switch to a Sound Wall, I encourage you to read my post: “Sound Wall vs. Word Wall.” Once you’ve developed a good understanding of a Sound Wall and why you should use one, come back to this post and learn how to implement a Sound Wall in your classroom today!
One more tidbit before we get started. Educators define the term “sight words” in a variety of ways. For this blog post, sight words refer to high-frequency words that we want students to recognize instantly. These words fall on a continuum ranging from regular (easily decodable) to somewhat irregular (following complex rules that aren’t as well known). Check out this FREE Fry’s Word List to learn more about sight words and their order of frequency.

Step 1 – Planning
Planning your Sound Wall probably seems like a no-brainer, but many educators don’t realize how other curriculum pieces need to align to get the most out of their Sound Wall instruction. Learning specialists, instructional coaches, and teachers will need to look at the scope and sequence for phonemes (English speech sounds), graphemes (letter or letters that represent a phoneme), sight words, and spelling instruction. Failure to align these instructional components destroys the systematic nature of a Sound Wall, leaving teachers and students confused and frustrated. Avoid the pitfalls of poor planning by reorganizing your literacy content in the following ways.
The Orton-Gillingham approach, and other research, recommends that teachers lead students to identify a phoneme (sound) and then explain the grapheme (letter or letters) that represents that sound. In other words, students would learn the letter-sound first and the letter name second. Then, students practice reading words in isolation and text with the phoneme-grapheme pattern. Last, students need to practice spelling words and writing sentences that contain this new learning. Use this framework when planning the sequence of instruction.
Begin by planning the order teachers will introduce letter-sound correspondences. Many kindergarten teachers introduce letters and the sounds they represent in alphabetical order. In this instance, the first five letter introductions include a, b, c, d, and e. This collection of letters does not lend itself to teaching the most frequent sight words. For example, the word “it” should not be introduced until students have learned that the /t/ sound is represented by the letter “t.” If teachers continued introducing letters in alphabetical order, students would not learn the letter “t” until the fourth or fifth week of school. Instead, start by looking at the most frequent and most regular sight words. What letters make up those sight words? Consider introducing the most frequent letters first. There is no one “right way” to order letter-sound introductions. However, when students are systematically introduced to phonemes, graphemes, and sight words, we increase their chances of reading success.
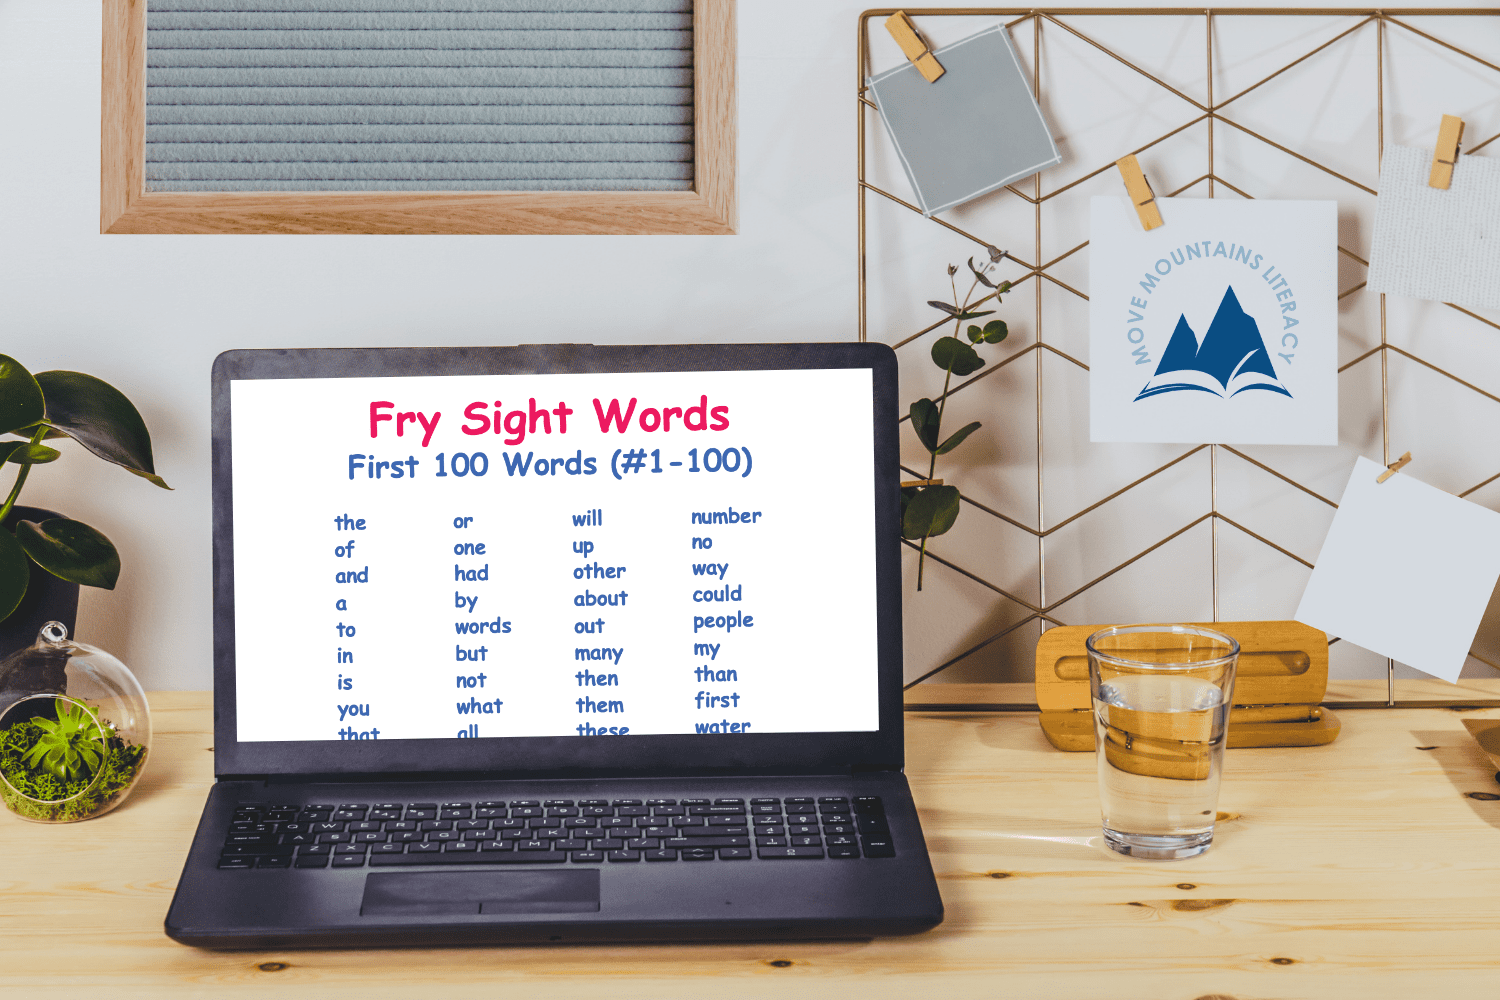
As you have witnessed, sequencing phonemes and graphemes will require knowledge regarding the frequency of sight words. Many teachers have used word lists developed by researcher Edward B. Fry and colleagues. Fry composed a list of the most frequent words found in printed material and ordered them according to their frequency. He found that the first one hundred words make up 50% of printed material (Fry, Kress, & Fountoukidis, 2000). Therefore, primary teachers aim to teach the first 100 words on Fry’s list as soon as possible. It is recommended to introduce 3-5 sight words each week. Here is a link to FREE Fry’s Word Lists to reference while planning your scope and sequence.
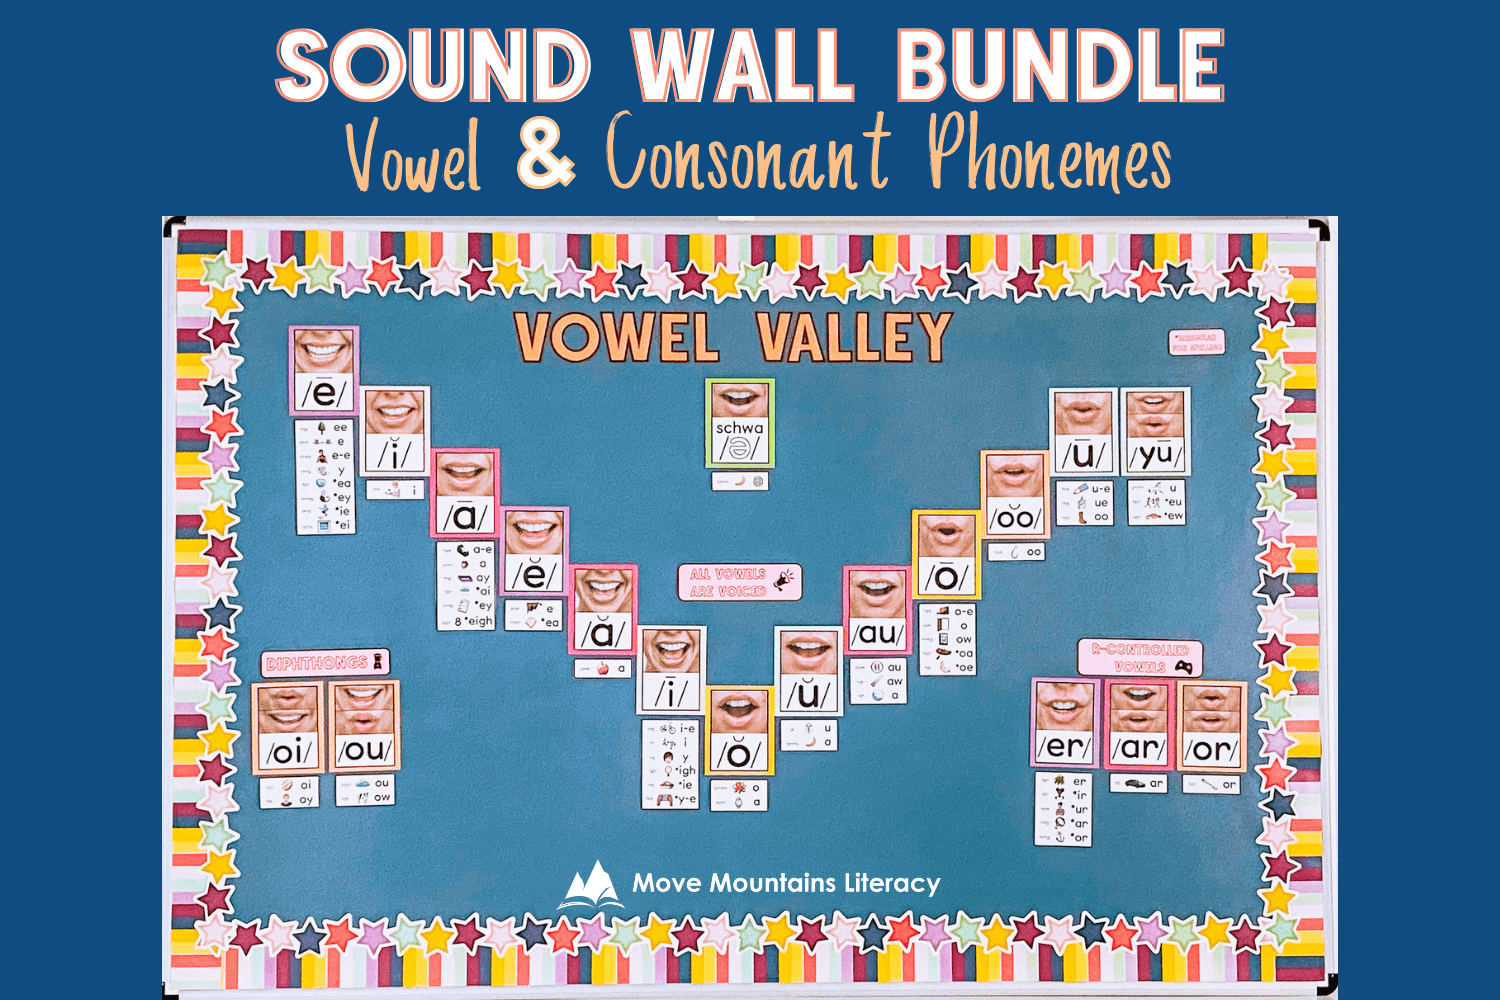
After you plan the scope and sequence of your sight words, decide where the sight words will go on the Sound Wall. If you have used a Word Wall in the past, you know that some letters house a ton of sight words, and some letters hold one or two. Try your best to evenly distribute sight words across your Sound Wall so that students have multiple examples of phoneme-grapheme correspondences under each sound. Create a physical or digital Sound Wall to use when planning. Add words to this Sound Wall as you plan where and how to distribute your sight words. This will allow you to make adjustments along the way.
The next step is to align spelling instruction with the phoneme-grapheme patterns students have learned. For example, many first-grade teachers begin the year by reviewing short vowels. During that week, teachers would review the short vowel sounds on the Sound Wall and sight words that contain regular short vowel spellings (ex: had, get, is, on, up). Spelling instruction would also include words with short vowels. The consistency in this design and the repeated exposure across the literacy block result in greater student success. The reality is that most teachers are using a curriculum that has a different focus for guided reading, sight words, and spelling. For example, a first-grade teacher could be teaching contractions in reading, diphthong oi and oy in spelling, and introducing “about,” “there,” and “people” as sight words. This format is not systematic, and it devours instructional minutes as educators must teach disconnected content. Save precious time by aligning instruction that makes learning more systematic for students. Use “A Catalog of Spelling” by Bruce Murray to help guide you through the planning process.
Lastly, be strategic when introducing irregular sight words and less reliable spelling patterns. The Orton-Gillingham approach and other leaders in the science of reading recommend teaching students the most frequent and most reliable phoneme-grapheme correspondences first. Once students have practiced regular patterns, educators need to explicitly teach sight words that contain irregularities and spelling patterns that don’t follow a particular rule. For example, if first graders were learning that a vowel in a “vowel-consonant-silent-e” pattern is long, teachers would provide sight words and spelling instruction that follow this rule. Later, the teacher would explicitly teach that some sight words do not follow this rule (ex: have, give, there). After students had practiced “vowel-consonant-silent-e” in spelling, students would learn that vowel teams are also used to spell the long vowel sound in words. Teaching students the most frequent and reliable spelling rules increases their chances of spelling an unfamiliar word accurately. Setting aside a separate time to teach the outliers helps them spell some of the most common words accurately.
Step 2 – Instruction
Now that you’ve planned the scope and sequence for letter-sound introductions, sight words, and spelling patterns, it’s time to develop a framework for instruction. What’s the best way for teachers to introduce phonemes, graphemes, and sight words? What does effective spelling instruction look like? Knowing the answers to these questions is crucial. It’s also important to develop consistent instructional practices across grade levels. This consistency helps teachers teach and students learn.
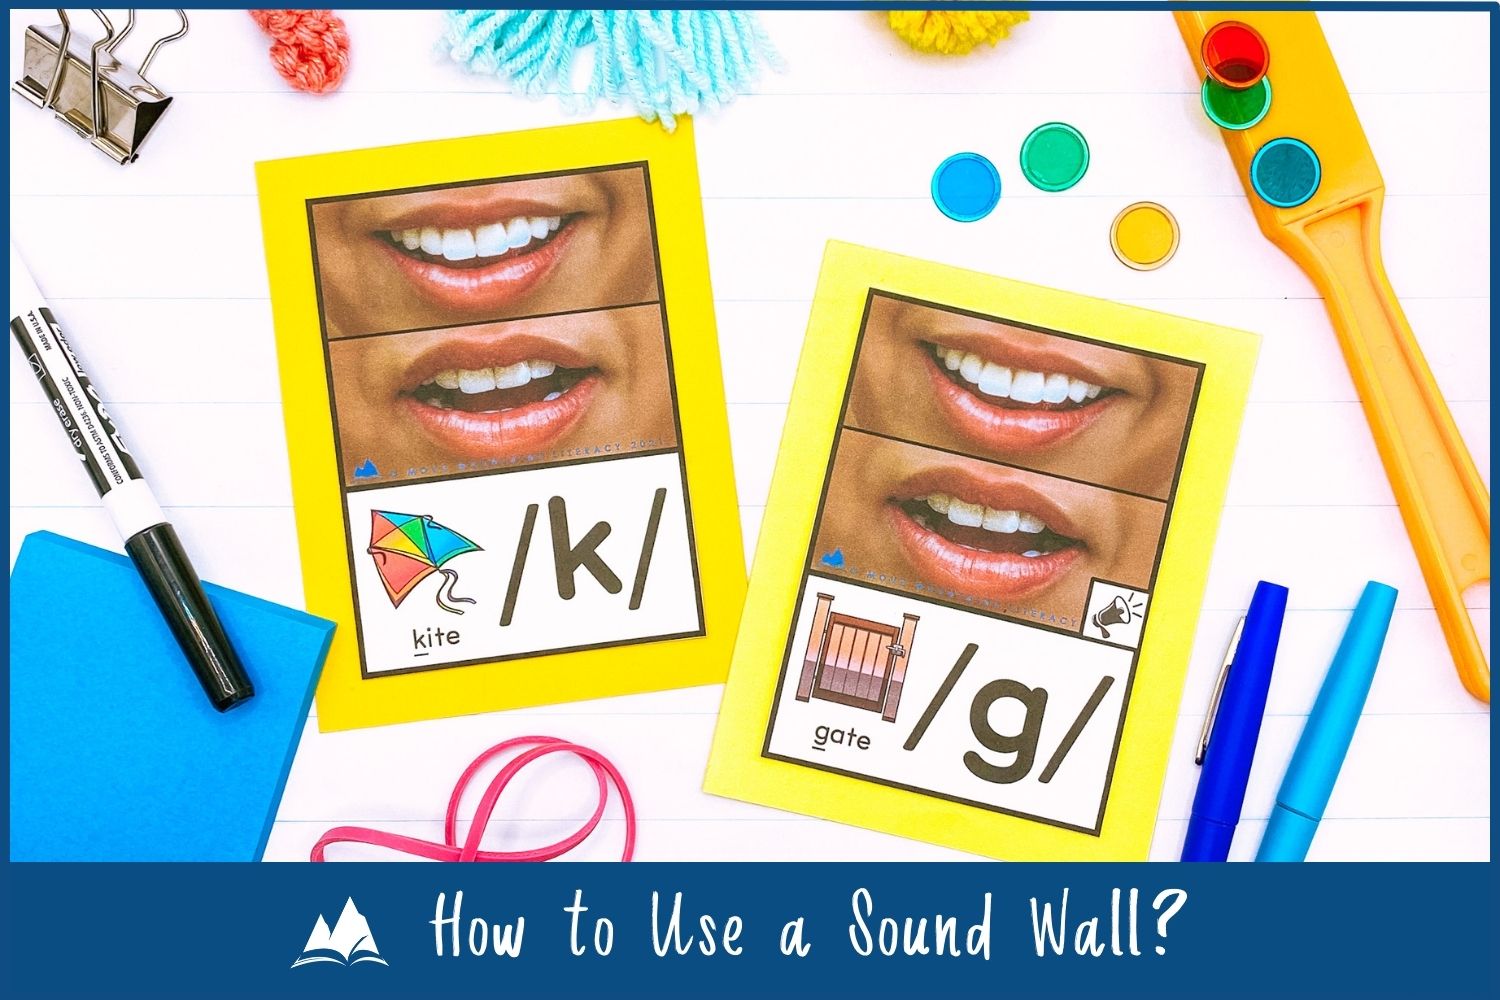
As mentioned before, the Orton-Gillingham approach introduces the phoneme first. Remember that a phoneme is the smallest unit of sound that a letter or letters represent. Let’s use the /m/ sound in “map” as an example. The teacher would begin by saying a list of words that contain the targeted sound. Students repeat each word while watching their mouth in a mirror and listening for the sound they have in common. For the /m/ sound, the teacher might say, “mud, mint, mail.” The teacher could support students by telling them to pay attention to the first sound in each word and watch what their mouth is doing at the beginning of each word. Once students have identified the /m/ sound, teachers and students would discuss what is happening when they make the /m/ sound. At this point, students are attending to their teeth, tongue, and lips. They will also decide if the sound is voiced or unvoiced. “Seeing” the sound in the mirror and discussing how the sound feels in their mouth makes the abstract concept of sound more concrete. The more a student knows about a sound, the better they are a retrieving it from memory and using it to help them read and write. To learn more about the articulation of English phonemes, watch the YouTube video below from the Rollins Center for Language and Literacy.
After the teacher has led students thru a thorough discussion of the phoneme, they will discuss the grapheme that represents the phoneme. A few phonemes have only one grapheme associated with them. Many times, a variety of graphemes represent the same phoneme. For example, the graphemes a, ai, ay, a-e, ea, ei, eigh can stand for the long /a/ sound. The teacher must be explicit when identifying the targeted grapheme for the day’s lesson. The teacher utilizes a “sound picture” to help students associate the phoneme with the grapheme. In this case, an image of a map is situated next to the letter “m.” When students reference the Sound Wall, seeing the image of the map next to the letter “m” will remind them that the letter “m” represents the /m/ sound. If students have learned enough letters to read words, the lesson would conclude with reading a few words with the phoneme-grapheme pattern. The teacher would write out words with previously taught letter-sound correspondences (ex: miss, met, man). Then the teacher and students would sound out and blend the phonemes to read the words as a class. This is the lesson format teachers should use when introducing phonemes and their graphemes throughout the year.
To become fluent readers and lighten the cognitive load for comprehension to occur, students need to develop an ability to read high-frequency words instantly. That’s why it is essential to have an effective routine for introducing sight words. Current research shows that word study through phoneme-grapheme mapping is the best way to learn sight words. This approach also helps students retrieve high-frequency words from memory quickly. The “Heart Word” method is a great way to practice phoneme-grapheme mapping. The teacher guides students through the process of matching the sounds (phonemes) in the word to the letters in the word (grapheme). When they encounter an irregularity, they mark that part of the word with a heart. Students will have to memorize this unexpected phoneme-grapheme correspondence. In other words, they will have to know it by heart (hence the term “Heart Words”). Click here to learn more and watch videos about the Heart Word method.

Once students have learned phoneme-grapheme correspondences and practiced reading words made up of these letter-sounds, students need to practice spelling words with those patterns. As mentioned before, spelling instruction should begin with the most frequent and most reliable spelling patterns. Don’t forget to use the “Catalog of Spelling” by Bruce Murray when deciding which spelling patterns to introduce first. Once students have had ample practice with regular spelling patterns, the teacher needs to provide explicit instruction on words with less reliable and more irregular spelling patterns. When students learn a spelling pattern, it is added to the Sound Wall. The visual may show the graphemes only. Other Sound Wall resources display a “sound picture” with the grapheme. Providing an image helps students remember the sound the grapheme represents.
Many students are given a spelling pre-test on Monday, sent home with a list of words to practice at home, and then take a spelling test on Friday. During the week, students typically “practice” their spelling words in a “word work” station. Students may be asked to rainbow write their words, use their words in sentences, build their words using playdough or magnetic letters, alphabetize their words, and the list goes on. Some of these practices are great for handwriting, vocabulary, and alphabetical order, but they do not help develop the students’ spelling abilities. There are several ways to teach spelling. For this post, I will share one technique that I think is the most beneficial for students.
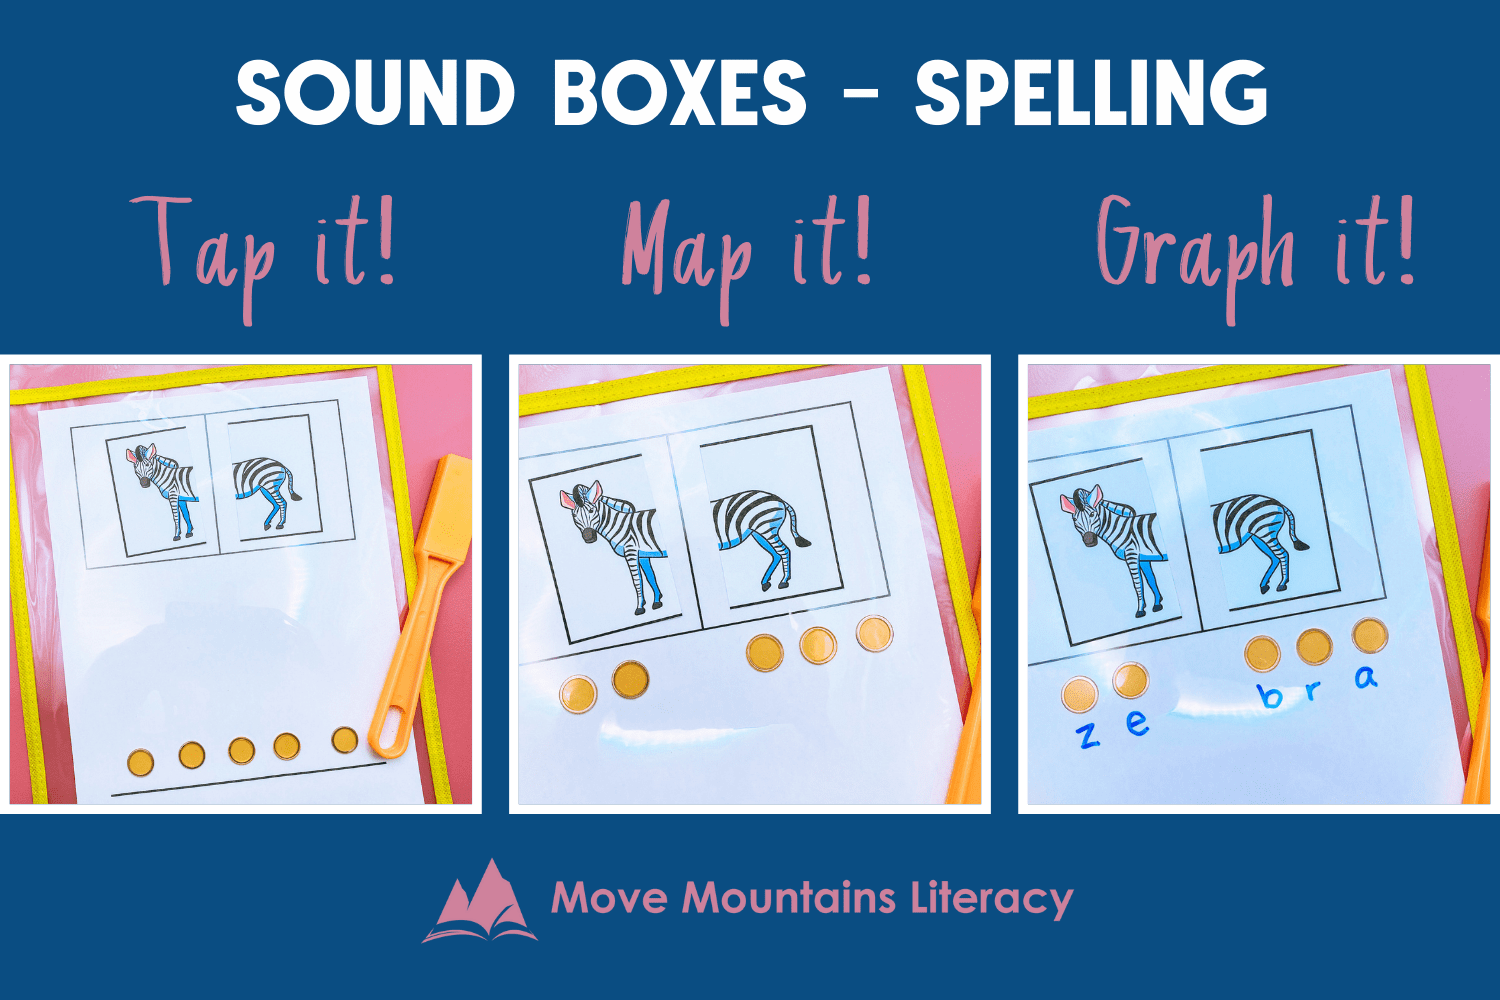
An effective way to teach spelling involves Sound Boxes. This strategy resembles Elkonin Boxes. Elkonin Boxes are used primarily for phoneme segmentation, and letters are not typically involved. When using Sound Boxes, students segment the sound by placing a cube or chip in each box. Then the student writes the corresponding grapheme in each box. Lastly, the student combines the graphemes to write the word. Sound Boxes can be done in a whole group or small group setting. Teachers must be present to provide immediate corrective feedback to the students. When students spell a multisyllabic word, they will begin by separating it into syllables. Next, they would spell the word one syllable at a time. If students are spelling a word with an affix (prefix or suffix), then students would separate the affix from the base word. This helps reduce the cognitive load required to spell words with affixes accurately. Using Sound Boxes reinforces what students have learned about phoneme-grapheme correspondences. In this way, reading supports spelling, and spelling supports reading.
Step 3 – Application
You’ve planned the scope and sequence for phonemes, graphemes, sight words, and spelling patterns. You’ve created and constructed a beautiful Sound Wall. You are going to allot time and energy to deliver effective literacy instruction. What’s the next step? How do you teach students to reference the Sound Wall and use it independently? By being intentional and designing meaningful classroom activities, teachers can make referencing the Sound Wall a habit for students.

Be sure to review the material you have introduced. This review should be quick and consistent. Several exposures help commit new learning to long-term memory and increase how quickly a student can recall this information. Play a game of “I Spy” as students line up for specials or dismissal. In “I Spy,” the teacher gives the students a sound. The students “spy” the sound on the Sound Wall and tell the teachers how that sound could be spelled, whether it is a vowel or a consonant, or if it is voiced or unvoiced. In addition, Teachers may choose to give the students a grapheme, and students reference the Sound Wall to provide the phoneme (or phonemes) that corresponds with the grapheme. My favorite way to review is using flashcards. They are quick and portable. Teachers can use these cards as students are lining up while the students are waiting in line in the hallway, during small group instruction at the guided reading table, or during whole group instruction with a document camera. No matter the approach, be sure to regularly review the phonemes and graphemes.
Students must be taught how to reference the Sound Wall. Just because students can see it doesn’t mean they know when or how to use it. Teachers can model how to reference the Sound Wall when reading and spelling. The teacher could pretend to struggle with decoding a word during a read-aloud. The teacher would identify the grapheme and then reference the Sound Wall to determine its sound. When writing in front of the class, the teacher could pretend to struggle with spelling a word. The teacher would find the phoneme (sound) on the Sound Wall and then see which grapheme is needed to spell the word correctly. The more a teacher can model and involve students in this process, the more likely students will use it independently.
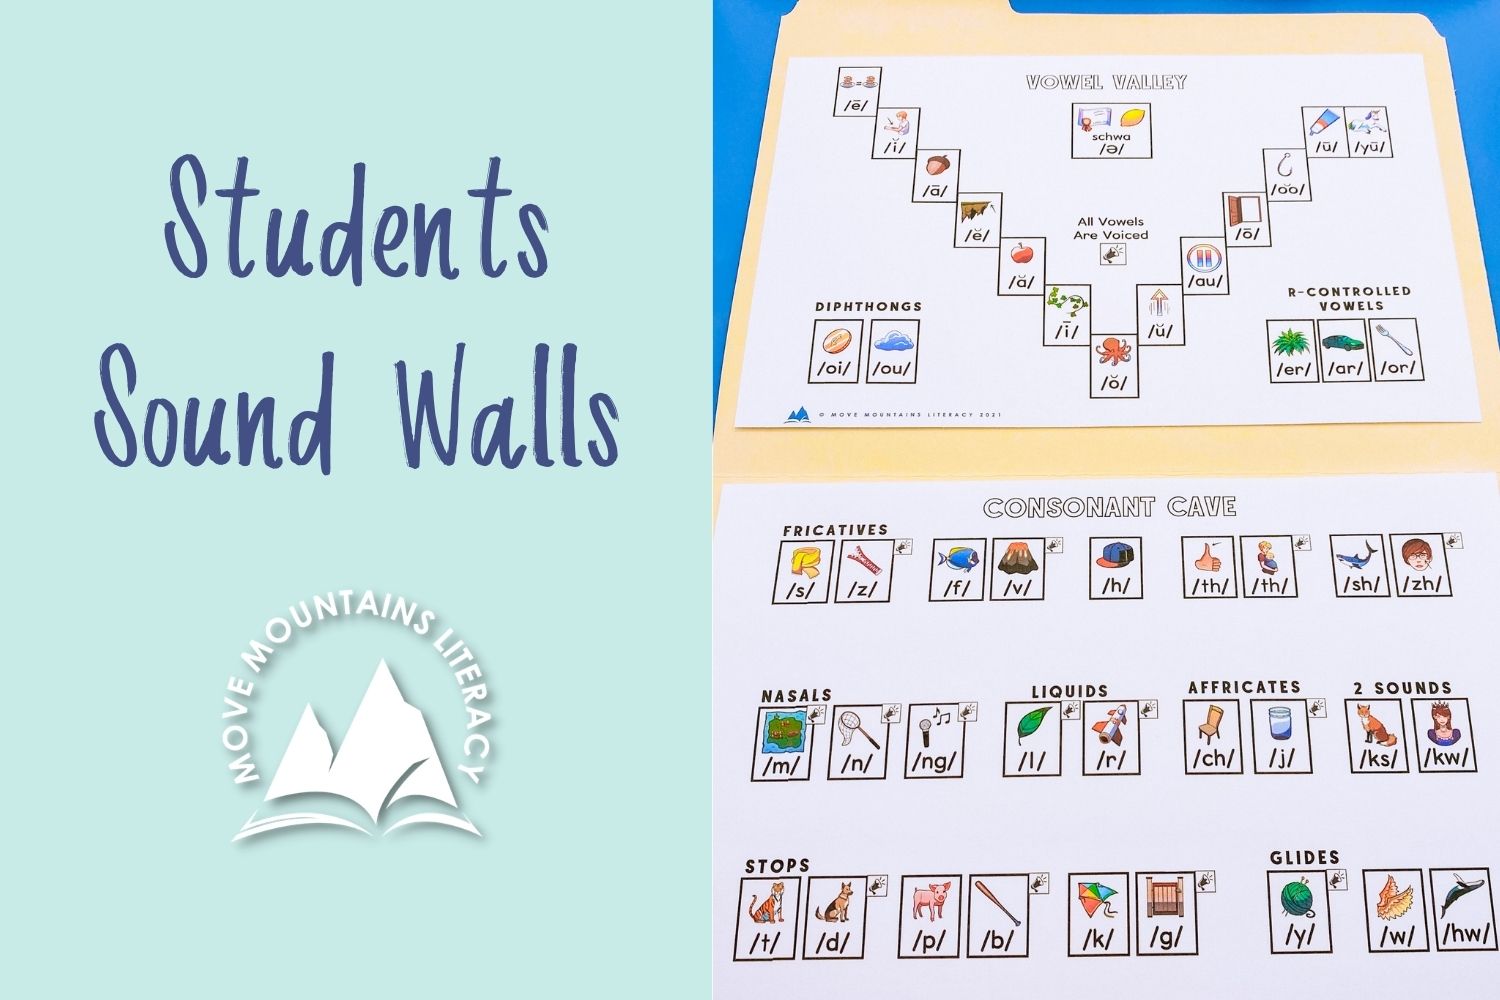
Students need to have easy access to the Sound Wall. Unfortunately, not every student will have a perfect view of a Sound Wall. In other situations, teachers can only implement a digital Sound Wall. Digital Sound Walls are great, but they aren’t always on display. The solution to these challenges is to provide each student with their own Sound Wall. Make student Sound Walls by printing out a copy and gluing it in a file folder. This resource is small enough for students to keep at their desks. It can also be displayed at various literacy centers, including reading, writing, and word work. Easy accessibility increases the chances of students referencing a Sound Wall.
Finally, students need plenty of opportunities to apply their new learning. Include previously taught phonemes in your phonemic awareness activities. Give students opportunities to read these phoneme-grapheme patterns in decodable texts. Remember to build word meaning and increase vocabulary by asking comprehension questions at the word and sentence level. Additionally, students need to practice spelling these phoneme-grapheme patterns. Go beyond spelling lists by having students participate in sentence dictation. Be sure to include words that reflect what students have learned. Avoid including concepts that have not been introduced. Teachers must provide immediate corrective feedback during these activities so that students are not practicing the wrong way and forming bad habits. Teachers must also hold students accountable for the phoneme-grapheme correspondences they have learned.
Sound Wall Resources
Begin implementing a Sound Wall in your classroom today! The Sound Wall Bundle featured in this post includes mouth articulation photos, letter-sound picture cards, sound spelling cards, and student Sound Walls. These products are also sold separately.
Want to learn more about Sound Walls? Visit the blog posts below:

Exclusive Freebies
Our email subscribers receive exclusive FREEBIES straight to their inbox!
Let’s Move Mountains!
-Faren
More Teaching Secrets Below